4.30.2008

Whole-Grain Blackberry Spice Muffins

I had been wanting to make some berry muffins lately, and I had been holding on to this recipe for sometime now, so I decided to make these last night. I will definitely not make the mistake of using fresh in place of frozen next time (I had a TON of fresh blackberries I wanted to use up), since my batter turned slightly gray in color. Oops. Although they aren't the greatest-looking muffins, they are quite tasty.

Whole Grain Blackberry Spice Muffins
Cooking Light

Ingredients

2 cups all-purpose flour (about 9 ounces)
1 cup rolled oats
1 cup packed dark brown sugar
1 1/2 teaspoons baking powder
1/2 teaspoon baking soda
1/2 teaspoon salt
1/2 teaspoon apple-pie spice
1 cup fat-free milk
3 tablespoons butter, melted
1 teaspoon vanilla extract
1 large egg, lightly beaten
1 1/2 cups frozen blackberries, coarsely chopped
Cooking spray
1/4 cup granulated sugar

Preparation

Preheat oven to 400°.

Lightly spoon flour into dry measuring cups; level with a knife. Combine flour and next 6 ingredients (through apple-pie spice) in a large bowl. Make a well in center of mixture. Combine milk, butter, vanilla, and egg in a small bowl; add to flour mixture, stirring until just moist. Gently stir in blackberries.

Spoon 1/4 cup batter into each of 17 paper-lined muffin cups coated with cooking spray. Bake at 400° for 16 minutes. Sprinkle muffins evenly with granulated sugar; bake 3 minutes or until muffins spring back when touched lightly in center. Cool in pans 10 minutes on wire racks.

Yield

17 muffins (serving size: 1 muffin)

4.28.2008

Out with the old, in with the new

Yesterday, we had to say goodbye to our dinnerware we loved so dearly. We had registered for the Kita dinnerware setting from Crate & Barrel, and after about a month of use, we found that the crackled glaze we loved so much was starting to stain. We tried everything to get it out (and this is not only from coffee and tea stains, but things as basic as tomato sauce & sriracha.) But no dice. We tried living with it. And continued to get upset every time one of the pieces would stain.

So yesterday, we finally bit the bullet and took them back. (Thank you Crate & Barrel returns department.)
RIP Kita dishes. We loved you.

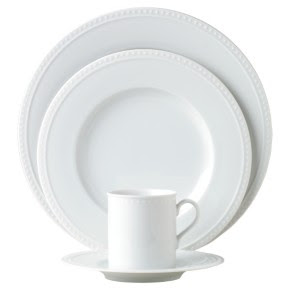
Fortunately, there is a happy ending here. We were able to find another place setting we liked ALMOST as much.

Introducing, Staccato. Welcome to our humble abode.

4.17.2008

Ginger Honey Cookies

These cookies are nice and soft in the middle, with a crisp edge. Next time I think I will try a little more ginger, or possibly even try out almond extract...they were just a little bland but they definitely have potential to be a great cookie.

Ginger Honey Cookies
Gourmet


Active time: 15 min Start to finish: 45 min
Servings: Makes 14 cookies

Ingredients

1 1/4 cups all-purpose flour
1 teaspoon baking soda
1/4 cup finely chopped crystallized ginger (I didn't have any on hand so I used 1/4 teaspoon ground; I definitely think this cookie needed more kick and this is probably where I went wrong.)
1/4 teaspoon salt
1 stick unsalted butter, softened
1/2 cup packed light brown sugar (I used dark brown sugar instead)
1 large egg
1/4 cup mild honey

Preparation

Preheat oven to 350°F with racks in upper and lower thirds.

Whisk together flour, baking soda, ginger, and salt in a bowl.

Beat together butter and brown sugar in a large bowl with an electric mixer at medium-high speed until pale and fluffy. Beat in egg and honey until combined. Reduce speed to low, then mix in flour mixture.

Drop 14 heaping tablespoons of dough 2 inches apart onto 2 ungreased baking sheets.

Bake, switching position of sheets halfway through baking, until golden, 10 to 14 minutes total (cookies will spread flat). Cool completely on sheets on racks.

Cooks' note: Cookies keep in an airtight container at room temperature 3 days.

4.06.2008

Ciabatta

Surprise, surprise...another post about bread. I actually wasn't planning on making this bread this weekend, but was missing one of the ingredients for the other bread my husband was begging...er...asking me to make (the Honey Wheat bread I made several posts back - it was a smashing hit!) But I was secretly thrilled because I had the opportunity to try yet another recipe on my list. I found this Ciabatta recipe on Williams-Sonoma's website. I have learned to be very careful when scanning recipes, particularly for bread - they can be very time-consuming, and I find it is best to plan my baking carefully around my schedule. This bread is made over the course of 2 days, but is actually really easy to make. It just involves a little bit of babysitting. I was pleased with the texture and taste of the end result - I will definitely make this again.

Photo courtesy of Nicholas Draney Photography

Ciabatta

The Italian word ciabatta, or "slipper," describes the shape of this loaf, which is like a flat slipper or old shoe. The dough is so wet that it is easiest to mix by machine. It is made with an Italian-style starter called a biga, which is firm like a bread dough rather than soft like a sponge. The biga must rest overnight, so plan to make this bread over the course of 2 days. The chewy loaf is dimpled with big, uneven holes, known as occhi, or "eyes."

The bread is baked on a baking stone, also called a pizza stone or a baking tile. These are available in large rounds and rectangles. Made of high-fired unglazed clay stoneware, they retain and distribute heat evenly, producing a more uniformly baked loaf and nicely browned crusts. To be effective, the stone must be preheated in the oven for at least 30 minutes before the bread is placed on it. Wipe the cooled stone clean after use; do not use soap and water.

Ingredients:

For the biga starter:
1 1/3 cups water, at room temperature
2 1/3 cups unbleached all-purpose or bread flour
3/4 tsp. active dry yeast

3 Tbs. warm water (105° to 115°F)
3/4 cup warm milk (105° to 115°F)
2 tsp. active dry yeast
2 to 2 1/3 cups bread flour, plus more as needed
1 1/2 tsp. salt
2 Tbs. olive oil, plus more for greasing

Directions:

To make the starter, in a stand mixer fitted with the paddle attachment, combine the water, 1 cup of the all-purpose flour and the yeast. Mix on low speed for 1 minute. Add the remaining 1 1/3 cups all-purpose flour and mix until smooth and soft, about 1 minute. Cover the bowl with plastic wrap and let stand at room temperature until almost tripled in bulk, 4 to 6 hours. The starter will smell yeasty. Refrigerate for 8 to 12 hours or for up to 3 days. When ready to make the dough, remove the starter from the refrigerator and let stand for 1 to 2 hours.

To make the dough, fit the mixer again with the paddle attachment. Add the warm water and milk and the yeast to the starter and mix on low speed, making a souplike mixture. Add 1 1⁄2 cups of the bread flour, the salt and the 2 Tbs. olive oil. Mix on low speed until smooth, about 3 minutes. Add only as much of the remaining bread flour as needed to form a very soft, moist dough, and mix on low speed for 5 minutes, occasionally scraping the dough off the bowl sides and paddle. The dough should be very soft and sticky, pulling away from the sides of the bowl but sticking to the bottom.

Cover the bowl with oiled plastic wrap and let rise at room temperature until doubled or tripled in bulk, about 2 hours. The top will be smooth, but the dough will be sticky under the surface. Line a large, heavy baking sheet with aluminum foil and sprinkle generously with bread flour. Turn the dough out onto a lightly floured board (it will deflate), sprinkle lightly with flour, and pat with your fingers into a 14-by-5-inch rectangle. Fold the rectangle like a letter, overlapping the 2 short sides in the middle to make 3 layers. Turn the dough 90 degrees and repeat the sprinkling and folding, letting the dough rest for 10 minutes if it seems too springy to fold. Cut the dough crosswise into 2 equal rectangles and place each half on the prepared baking sheet. Cover loosely with plastic wrap and let rest for 20 minutes. Sprinkle the tops generously with flour. Holding your fingers in an open, splayed position, press, push and stretch each dough rectangle, making an irregular rectangle about 11 inches long and the width of your hand. Your fingers will press the dough unevenly, producing the characteristic dimpled texture in the baked loaf. Cover again loosely with plastic wrap and let rest until tripled in bulk, about 1 1⁄2 hours. Press the dough to accentuate the dimpling 2 more times during this rise. The loaves will remain relatively flat.

Place a baking stone on the lower rack of an oven and preheat to 425°F.

Sprinkle the tops of the loaves with flour and place the baking sheet on the stone. Bake until the loaves are deep golden brown, 20 to 25 minutes. Let cool on the baking sheet. Serve warm or at room temperature. Makes 2 large loaves.

Adapted from Williams-Sonoma Collection Series, Bread, by Beth Hensperger (Simon & Schuster, 2002 ).

Fresh Berry Buckle

I discovered this recipe on the Pioneer Woman's blog, and it looked so amazing. She calls it Blackberry Cobbler, but after reading through all of the comments on her post, it seems the appropriate term for this concoction is "buckle." Hmmm. Anyway, no matter what you call it, it is awesome. You can pretty much use any fruit you like with it - peaches, blueberries, raspberries, blackberries....mmmm. I used a combination of blackberries and raspberries. Just add a dollop of whipped cream on the side...I imagine ice cream would be even better. I will have to make sure to pick some up the next time I make this yummy dessert.

Fresh Berry Buckle

1 1/4 cups sugar (I used 1 cup Splenda to bake with, and used real sugar to sprinkle over the berries.)
1 cup self-rising flour
1 cup milk
1/2 cup butter, melted
2 - 3 cups berries (can be fresh or frozen; I used fresh blackberries and raspberries.)
Cooking spray


Place 1/2 cup butter (1 stick) in a microwaveable dish. Melt the butter. In a mixing bowl, whisk together 1 cup sugar (Splenda) and 1 cup self-rising flour. Whisk in 1 cup milk, mixing together well. Take melted butter and pour into bowl; whisk together. Coat baking dish with cooking spray; I used a 9" round dish. Pour batter into greased dish. Sprinkle the 2 - 3 cups of berries over the top of the batter, trying to distribute them evenly.

Sprinkle 1/4 cup sugar evenly over the top. Bake at 350 degrees for 1 hour, or until golden and bubbly.

All photos courtesy of Nicholas Draney Photography